
6 geriausi didžiųjų raidžių keitimo mažosiomis raidėmis metodai
Yra daugybė metodų, kuriais galite pakeisti didžiosios raidės tekstą į mažąsias „Excel“. Šiame vadove mes apžvelgsime 6 geriausius metodus, kaip išsamiai padaryti didžiąsias raides mažosiomis raidėmis.
# 1 Mažosios funkcijos naudojimas norint pakeisti „Excel“ raidę
„MS Excel“ yra įmontuota funkcija, skirta kiekvieno žodžio simbolio dekapitalizavimui, tai yra LOWER funkcija .
Pavyzdys
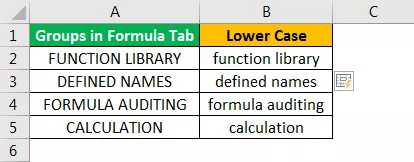
Tarkime, kad mes turime kai kurių veiksmažodžių sąrašą „Excel“, norime pakeisti teksto didžiąsias ir mažąsias raides.

Norėdami pakeisti raidę į mažąją, turime įrašyti funkciją langelyje C2 kaip „= LOWER (A2)“. „=“ Arba „+“ ženklas naudojamas funkcijai parašyti, „LOWER“ yra funkcijos pavadinimas, o A2 yra langelio nuoroda į tekstą, kurio raidę norime pakeisti.

Paspauskite Enter ir ši funkcija pavers visas teksto eilutės raides į mažąsias.

Dabar konvertuojama viena vertė. Kitoms reikšmėms mes galime paspausti „Ctrl“ + D, pasirinkę visas ląsteles su viršutine ląstele, arba paspausti „Ctrl“ + C ir „Ctrl“ + V, jei norite nukopijuoti ir įklijuoti funkciją. Arba galime vilkti formulę kitose ląstelėse, kad gautume atsakymą.

# 2 VBA komandos mygtuko naudojimas
Mes galime sukurti komandinį mygtuką VBA ir priskirti kodą, kad šis tekstas būtų pakeistas į mažąsias, naudojant komandos mygtuką.

Pavyzdys
1 žingsnis: Norėdami sukurti komandos mygtuką, spustelėkite „Įterpti“ komandą „Kūrėjų skirtuko„ Excel “ grupėje „ Valdikliai “ . Ir pasirinkite „Komandos mygtuką“.

2 žingsnis: Spustelėkite darbalapio vietą, kurioje norite rodyti komandos mygtuką. Komandos mygtuko dydį galime pakeisti naudodami mygtuką ALT .

3 žingsnis: Naudodami komandą „Ypatybės“ , pakeiskite komandos mygtuko ypatybes, pvz., Antraštę, pavadinimą, „AutoSize“, „WordWrap“ ir kt.


4 žingsnis: Dabar, priskirti kodą į komandų mygtuką, spustelėkite ant "Peržiūrėti kodo" komandą į "kontroliuoja" grupės "užsakovas" Įsitikinkite, kad "Design Mode" yra aktyvuota.

5 žingsnis: Atsidariusiame lange išskleidžiamajame sąraše pasirinkite „ConvertToLowerCase“ .

6 žingsnis: Įklijuokite šį kodą tarp eilučių.
Kodas:
Dim Rng As Range Dim c As Range On Error Tęsti kitą rinkinį Rng = kiekvieno c pasirinkimas Rng c.Value = LCase (c.Value) Kitas c

7 žingsnis: Uždarykite „Visual Basic“ redaktorių. Įsitikinkite, kad failas išsaugotas su .xlsm plėtiniu, nes darbaknygėje turime makrokomandą.
8 veiksmas: išjunkite „Design Mode“ . Dabar, pasirinkus reikiamus langelius, kai tik spustelėsime komandos mygtuką, reikšmės paverčiamos mažosiomis.
Pasirinkite visas reikšmes iš A2: A10 ir spustelėkite komandos mygtuką. Tekstas bus pakeistas į mažąsias.

# 3 Naudojant VBA spartųjį klavišą
Šis būdas yra panašus į pirmiau pateiktą, išskyrus tai, kad čia nereikia kurti komandos mygtuko.
Pavyzdys
1 žingsnis: Atidarykite „Visual Basic“ redaktorių skirtuke „Kūrėjas“ arba naudodami „Excel“ spartųjį klavišą („Alt“ + F11) .

2 žingsnis: Įdėkite modulį naudodami komandą Įterpti meniu -> Modulio komanda.

3 žingsnis: Įklijuokite šį kodą.
Sub LowerCaseConversion() Dim Rng As Range Dim c As Range On Error Resume Next Set Rng = Selection For Each c In Rng c.Value = LCase(c.Value) Next c End Sub

Step 4: Save the file using Ctrl+S. Exit the visual basic editor. Make sure the file is saved with .xlsm extension as we have a macro in our workbook.
Step 5: Now choose the ‘Macros’ in the ‘Code’ group in the ‘Developer’ tab.

Step 6: Then click on ‘Options’ and assign the shortcut key to the Macro, and we can write a description as well.

In our case, we have assigned Ctrl+Shift+L.

Step 7: Macro is ready to use. Now to change the values into lowercase, select the required cells, and press Ctrl+Shift+L.

#4 Using Flash Fill
If we establish a pattern by typing the same value in the lowercase in the adjacent column, the Flash Fill feature will fill in the rest for us based on the pattern we provide. Let us understand this with an example.
Example
Suppose we have the following data, which we want to get in lowercase.

To do the same, we need to write the first value of the list in the lower case manually in the adjacent cell.

Come to the next cell in the same column and just press Ctrl+E.

Choose ‘Accept Suggestions’ from the box menu appeared.

That is it. We have all the values in the lower case now. Now we can copy the values, paste the same onto the original list, and delete the extra value from the right.
#5 Enter Text in Lower Case Only
We can make a restriction so that the user can enter text values in lowercase only.
Example
To do this, the steps are:
- Select the cells which you want to restrict.
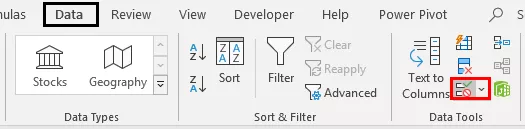
- Choose ‘Data Validation’ from the ‘Data Tools’ group from the ‘Data’ tab.
- Apply the settings explained in the figure below.


- Now, whenever the user enters the value in capital letters, MS Excel will stop and will show the following message.

#6 Using Microsoft Word
In Microsoft word, unlike Excel, we have a command named ‘Change Case’ in the ‘Font’ group in the ‘Home’ tab.
Example
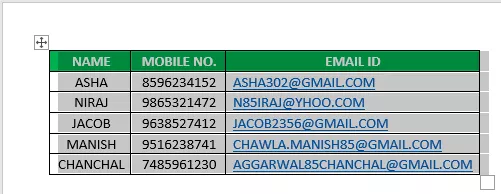
Suppose we have the following table of data for which we want to change the text case to ‘Lower’ Case.

To change the case, first, we will copy the data from MS Excel and paste it into MS Word. To do the same, the steps are:
Select the data from MS Excel. And press Ctrl+C to copy data from MS Excel.

Open the MS Word application and paste the table using the Ctrl+V shortcut key.

Select the table using the ‘Plus’ sign on the left-top side of the table.
Choose the ‘Change Case’ command from the ‘Font’ group and select ‘lowercase’ from the list.

Now, the data table is converted to ‘Lower.’ We can just copy the table after selecting the ‘Plus’ sign from the left top corner and paste it into Excel back.
Seną lentelę galime ištrinti naudodami kontekstinį meniu, kurį galime gauti dešiniuoju pelės mygtuku spustelėję lentelę.

Ką reikia atsiminti
Norėdami konvertuoti reikšmes į mažąsias raides, jei naudojame VBA kodą (komandų mygtuką arba spartųjį klavišą), turime išsaugoti failą su .xlsm plėtiniu, nes darbaknygėje turime makrokomandas.


